Then what? Well I started easy. I wanted some fork bleeders. I truck the bike to the trails and I like letting the pressure out of the forks while the bike is tied down. And of course zeroing the pressure after unloading and before riding is important.
I wanted some low profile bleeders, as some that I’ve seen stick up pretty high. Surfing a bit I found these by System Tech Racing, STR.
http://www.systemtechracing.com/Articles.asp?ID=143
Installation is simple, and here they are on my bike. You can see the bleeder is nice and low. And they come with a sweet orange top.
Jumat, 23 Agustus 2013
KTM 350 EXC-F
I bought a 2013 KTM 350 EXC-F about 3 months ago, after selling my 2010 Husqvarna TE 250. I had the Husky set up just as I wanted and I knew that I would do most of the same mods to my new KTM right away.
Fortunately, E-Ticket has written a GREAT guide on ktmtalk.com for most of the great mods for the 350. He deserves most of the credit as much of what I ended up wanting to do had been done by him first and it made it easy to read his directions. Thank you E-Ticket!
That said, sometimes I have my own take I things and I’ll show them here. For instance, I’m short and light, so some of the mods are focused on helping me reach the ground. And I’ve very careful to try and keep things as light as possible.
Here is the bike when I started:
Fortunately, E-Ticket has written a GREAT guide on ktmtalk.com for most of the great mods for the 350. He deserves most of the credit as much of what I ended up wanting to do had been done by him first and it made it easy to read his directions. Thank you E-Ticket!
That said, sometimes I have my own take I things and I’ll show them here. For instance, I’m short and light, so some of the mods are focused on helping me reach the ground. And I’ve very careful to try and keep things as light as possible.
Here is the bike when I started:
Kamis, 01 Agustus 2013
Cutting the Seat, Lowering the Bike
| BEFORE |
| AFTER |
One of the best ways to lower the height of a motorcycle is to cut the seat. It's cheap, fairly easy if you are patient and even if you blow it it's not to expensive to fix (on my KTM a new replacement seat is about $100).
I have pretty short legs (a 28" inseam) so I decided to cut the seat on my KTM as low as it could go. Obviously, you can cut your seat much less than this.
What do you need
- a pneumatic staple gun. You can't do this with a hand held stapler, don't even try. Alternatively, you can do everything else, and then bring the seat to your local upholstery shop and ask them to staple the cover on for you. I've done this and its very quick and easy for a pro, maybe 15 minutes!
- stainless steel staples (no rusting!) I use 1/4 deep. You want them short so they don't go through the foam.
- a LONG bread knife. The longer the better. I use a 10" one.
- a Surform flat file. Get one, it's worth it. I've heard guys do the final shaping with sand paper... that must take forever! The Surform makes it easy.
- a vacuum cleaner to clean up all the foam bits and dust
- a day without wind (or a well lit garage)
Step one: Photos
Take pictures of your existing seat for reverence. Particularly take shots of the existing staple work so you can reference them when you put your staple on. The bottom of most seats is irregular, and seeing how the factory placed the staples can help.
Step Two: Cover Removal
Remove the existing cover. In some cases you might not have to take it all the way off, like if you only want to trim the front of the seat. I use a pic to pry the staples up:
And then pliers to pull the staples out:
Step Three: Marking the Seat
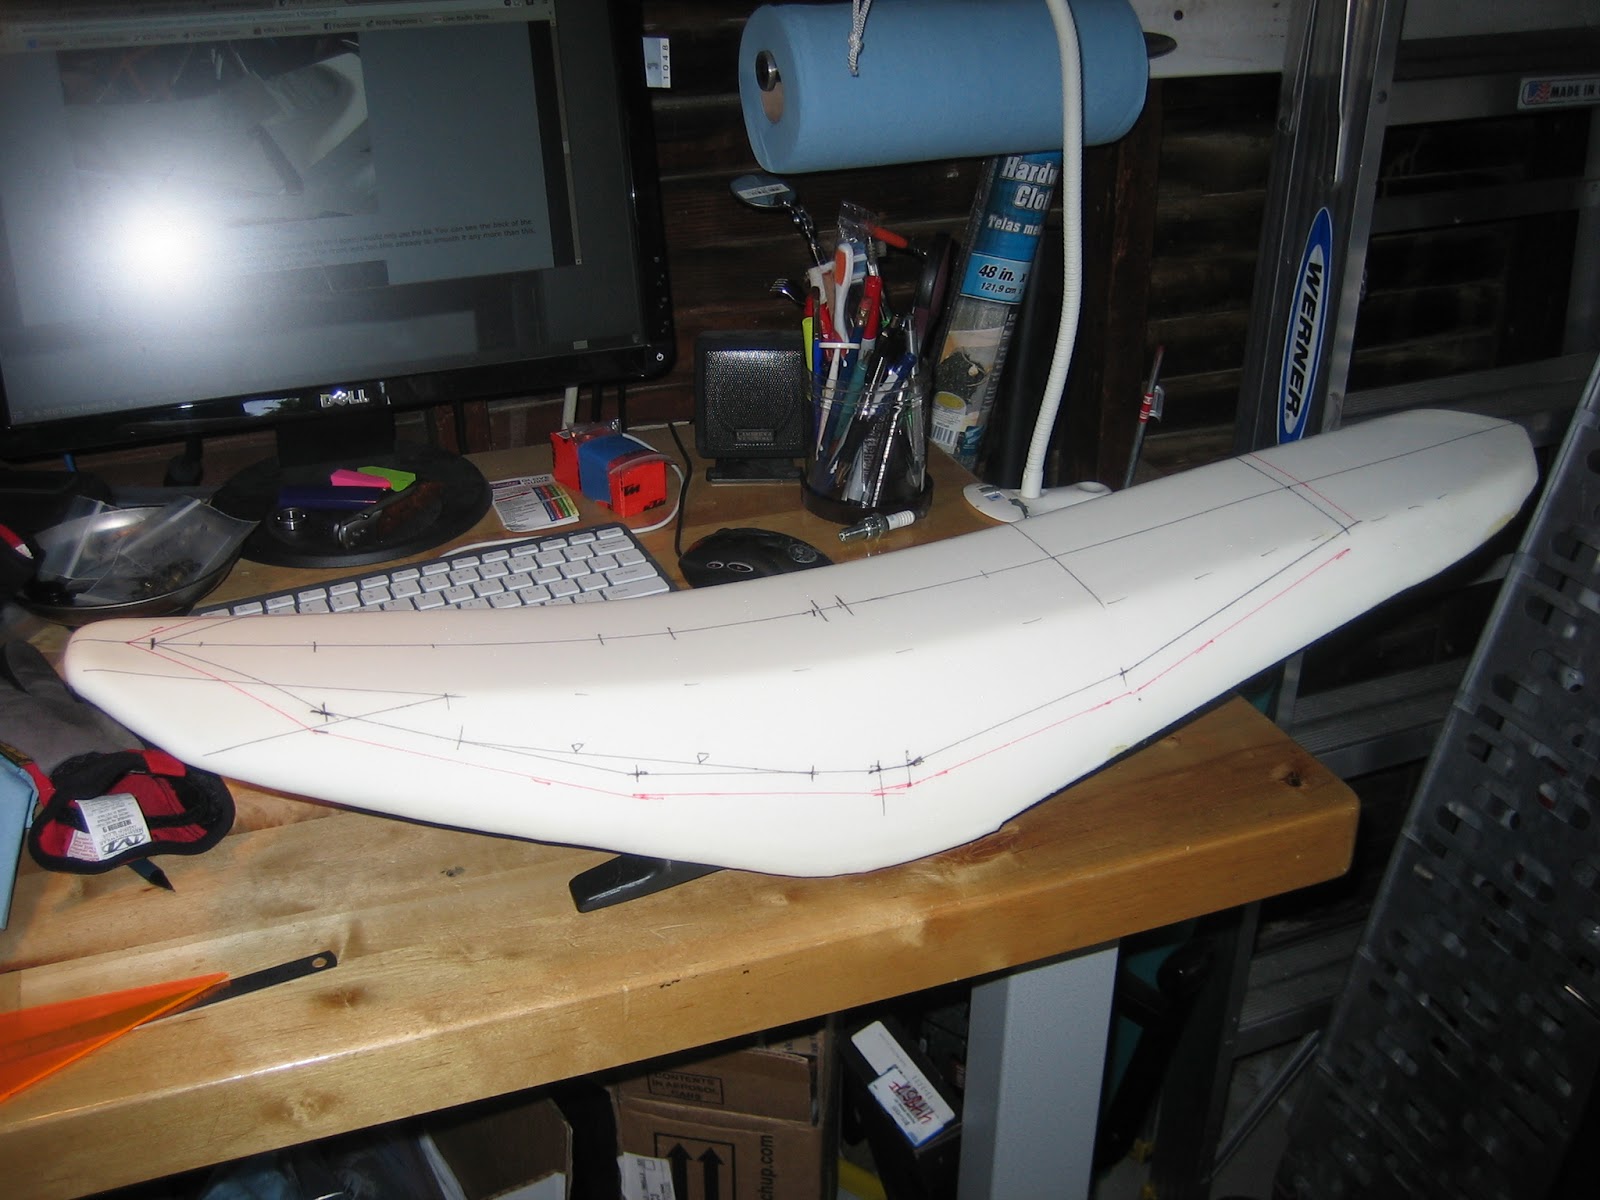
This is the important part to get right. Mark a line down the middle of the seat from front to back with a fine point sharpie (felt tip pen). Then mark a cut line on both sides of the seat. Measure down from the center line to be sure the lines on both side are symmetrical. You can see I have all sorts of marks that I used to make my measurements. The black line is the "cut line" is where I want to cut. It is important to make another line a "reference line" (I used red) a bit below the cut line! Because after you cut and file a bit, your cut line will be gone, the red line below serves as a reference after the cut line is obliterated. (I learned to do this the hard way.)
You need to be very careful to look at the underside of the seat and to be sure you leave enough foam to protect your butt from the seat pan. This is the time to inspect, measure and mark carefully. And then to check it all twice more.
Step Four: Cover the Bike
Cover the bike and put the seat back on. I've done this without covering the bike and foam got everywhere... not good as you don't want foam bits to melt onto hot parts of your bike next time you run it. Cover the bike to prevent this problem. Also, do this on a day without any wind, otherwise the foam filings will blow everywhere!
Step Five: Cut!
Cut the seat. The picture below is from cutting my old Husky. Getting started can be hard, especially with a thin cut. It might be better to make the first cut in the middle where it is thickest. A long knife allows you to hold both ends and watch the cuts on both sides of the bike. An assistant can be helpful with this too... my wife was kind enough to watch the far side and warn me if I was heading off course. You really need a knife longer than the cut you are making. Note on this cut on the Husky seat I don't have the extra red line for a reference. It would have been easier with that.
Here is the slice I took out of the KTM seat. You can see I started in the middle where it was a thick cut and did the front part and then I cut the rear. Frankly, it's easier to make a big cut like thin than a thin one! It's like cutting soft bread!
Step Six: File or Sand
This is a great shot. This is right as I started filing with the Surform. You can see the uneven cut marks from the bread knife. You can also see the red marking line that will help me keep the seat even after the other black line has been obliterated.
And here is the seat after I finished filing the flat top. You can see it's smooth but not perfect. Small imperfections will be invisible when you pull the seat cover tight over the foam. Get the seat as good as you can but don't worry any small stuff.
The original KTM seat has a bevel, it's not a flat top like above. So I drew a new center line and two other lines parallel to it to mark where the bevel would end. I wanted the bevel to end crisply on the top. Some people might prefer it to be rounded but this was my choice. I also added some marks for the bottom edge of the bevel, but they aren't in this photo.
Here is a picture of me making the final bevel with the Surform file. I use the Surform to do all the final touches.
Step Seven: Covering
I use a layer of thin plastic wrap from the kitchen over the seat. I'm not sure this is necessary, but I'm a bit concerned the raw seat from the cutting might be more likely to absorb water. Hopefully this thin plastic layer would prevent that. You can also see the sharp edges I made on the bevel and the remnants of the pen marks I made to guide that filing.
And here is a shot of the scotch tape I used to hold the plastic wrap in place while I covered the seat.
Now it's a time to stretch the cover on. You saw earlier I removed a lot from this seat, so I had to work stretch the cover tight Fit the ends over first and put a few staples on those ends to hold it in place if necessary. Then do the middle! The middle really has to be tight first before you can work back to the ends. You don't want to end up with loose material in the middle of the seat.
Here are some shots of all my stapling.
Finished!
Here are my shots of the finished seat. This is just about as thin as this seat can be. Note how nicely the bevel came out and how nice and smooth the cover is. I'm really happy with it.
Another sample
These are shots of my Husky that I did about a year ago.
On this seat I removed much less foam. You can also se that I left this seat a bit rougher before covering it. The front foam was very thin and I was just hesitant to file too much away. The ridges in the foam ended up being invisible through the cover, but you could just feel them with your hand if you checked. So Ideally you would sand it a bit smoother than this. But you can how nicely even this thin cut came out!
Minggu, 30 Juni 2013
Loctite 5910, 598 and Permatex Ultra Black
Valve Cover Gasket Sealants
On my KTM, the corners of the “half circle” parts of the valve cover rubber gasket are supposed to have a little bit of “Loctite 5910” put on them before installation. However, it appears Loctite 5910 is only available in Europe. My web searches seemed to indicate that the closest thing to this in the USA is “Loctite 598”. That can be easily ordered online, but is still not at any of my local stores... they all carry Permatex products instead. It seems “Permatex Ultra Black” gasket maker is the closest Permatex product I could find. I looked at all the tech data sheets, and while I’m not a chemical engineer, these three products did seem very similar to me.
Loctite 5910 (Europe only?)
Loctite 598 (Professional distribution only?)
Permatex Ultra Black (Found at my local auto parts store)
All three of these ar Oxime Silicone, thixotropic paste. All are RTV (room temperature vulcanizing). All are oil resistant. And the properties once cured all seem similar to me.
If anyone knows of a substantial difference between these three products, please let me know!
On my KTM, the corners of the “half circle” parts of the valve cover rubber gasket are supposed to have a little bit of “Loctite 5910” put on them before installation. However, it appears Loctite 5910 is only available in Europe. My web searches seemed to indicate that the closest thing to this in the USA is “Loctite 598”. That can be easily ordered online, but is still not at any of my local stores... they all carry Permatex products instead. It seems “Permatex Ultra Black” gasket maker is the closest Permatex product I could find. I looked at all the tech data sheets, and while I’m not a chemical engineer, these three products did seem very similar to me.
Loctite 5910 (Europe only?)
Loctite 598 (Professional distribution only?)
Permatex Ultra Black (Found at my local auto parts store)
All three of these ar Oxime Silicone, thixotropic paste. All are RTV (room temperature vulcanizing). All are oil resistant. And the properties once cured all seem similar to me.
If anyone knows of a substantial difference between these three products, please let me know!
Senin, 17 Juni 2013
Steering head bearing adjustment
Adjusted my steering head bearings because I thought they were a bit loose. Then again, maybe my stand was wobbling a bit. Sigh. At any rate, here's what I do.
1- I loosen all the bolts on the top clamp and give the clamp area around the fork a light tap with a rubber mallet to free things up.
2- I loosen the top nut until things are really free and I can feel a bit of a click in the fork legs when I pull them forward and back.
3- Then I tighten the top nut until it feels tight and then I can feel the steering is a bit restricted. Just enough so with the front wheel in the air the handle bars won't fall to the side when I push them. I check there is no play in the fork legs.
4- Final adjustment: I loosen the top nut *just enough* that the handle bar, when knocked up a bit from full lock will fall back down on it's own. If you knock it a bit harder from full lock it will stop at the center. It's not completely free spinning like it is when loose, but there is only a smooth glide when you move the bars, no restriction. At the bottom of the fork legs there might be the smallest click when you push forward and back, but then again it may be my stand. ;-)
5- Lastly, I tighten the clamp bolts, fork legs first. I tighten both bolts on one leg to 10 ft-lbs, then 12.5 ft-lbs, then 14.5 ft-lbs (20 Nm). I do then go back and forth between the bolts at 14.5 ft-lbs to be sure each bolt is up to torque.
Well, that's my way, FWIW.
Carl
1- I loosen all the bolts on the top clamp and give the clamp area around the fork a light tap with a rubber mallet to free things up.
2- I loosen the top nut until things are really free and I can feel a bit of a click in the fork legs when I pull them forward and back.
3- Then I tighten the top nut until it feels tight and then I can feel the steering is a bit restricted. Just enough so with the front wheel in the air the handle bars won't fall to the side when I push them. I check there is no play in the fork legs.
4- Final adjustment: I loosen the top nut *just enough* that the handle bar, when knocked up a bit from full lock will fall back down on it's own. If you knock it a bit harder from full lock it will stop at the center. It's not completely free spinning like it is when loose, but there is only a smooth glide when you move the bars, no restriction. At the bottom of the fork legs there might be the smallest click when you push forward and back, but then again it may be my stand. ;-)
5- Lastly, I tighten the clamp bolts, fork legs first. I tighten both bolts on one leg to 10 ft-lbs, then 12.5 ft-lbs, then 14.5 ft-lbs (20 Nm). I do then go back and forth between the bolts at 14.5 ft-lbs to be sure each bolt is up to torque.
Well, that's my way, FWIW.
Carl
Rabu, 05 Juni 2013
Supersprox vs Dirt Tricks Ironman Sprocket Weight
Being a lightweight myself I like to keep my bikes light. The rear sprocket on a motorcycle is often a heavy steel part. You can get aluminum sprockets, but they often wear out very quickly. So the sprocket manufacturers have been coming up with cool ideas like making sprockets with aluminum centers and steel teeth or making sprockets of super strong spider webbed steel. I was curious which approach might be lighter.
So I weighed one of each! These are both 48 tooth sprockets for a KTM.
Supersprox 48T: 25.1 oz
Dirt Tricks Ironman 48T: 19.6 oz
Supposedly the Dirt Tricks Ironman sprocket approaches the weight of an aluminum one... but I don't have one handy to weigh.
While I was at it I weighed a pair of front sprockets. I had a OEM KTM sprocket and a Dirt Tricks one. Both are 13 tooth.
KTM 13T: 4.5 oz
Dirt Tricks Ironman 13T: 4.3 oz
I put the Ironman products on my bike.
I also heard rumors that it was a good idea to grease the splines where the front sprocket mounts. Supposedly the hammering away of the drive train wears down the splines and proper grease can help prevent this. Google around advrider.com and you will find lots of threads on that. At any rate, normal grease won't do, you want high a high pressure moly grease. Apparently most people use Honda Moly 60 Paste. It's cheap enough. Another recommended fix is the dirt sticks washer on the front sprocket. Its harder and and supposedly holds the sprocket in place better.
Here you can see I've applied the Moly 60 paste to the sprocket. I was careful to use as little as possible. I also put it on the sprocket, not the shaft, hoping that any excess would be pushed to the outside of the sprocket where it could easily be wiped off.
Here's a shot of the installed sprocket. I cleaned the threads with a tap and used new loctite. Note I have marked it so I can see if it ever decides to come loose.
I should also note that I have seen the WASHER turn , while the bolt remains tight. I called dirt tricks, and they said that happens sometimes... I'm not sure what to think of that. But as long as the bolt stays tight I figure things are good.
Minggu, 26 Mei 2013
KTM Gas Cap Fix
New KTMs come with a fuel tank cap that often won't come off. It's really amazing KTM ships such a great bike with this common problem.
The problem is the button on top of the gas cap doesn't let you remove the cap sometimes. I'd heard this was often a problem, and when I picked up my new bike at the dealer yesterday I tried to remove the cap... and sure enough it didn't come off easily.
First, here are some tips if you get the cap stuck on:
- -There are three prongs that need to lift UP to release the cap. So you aren't helping if you are pushing down on the cap when you try to remove it. You need to pull UP on the cap at the same time as pushing DOWN on the button. If the cap is really stuck get someone else to push the button while you LIFT and turn the cap
- - Also, if you only push on the tab, that might only release the prong on that side of the cap, and if any of the three prongs stay down the cap won't release. Try removing the vent hose and push down on the center where the hose was. Don't use a using a tool to push as it is unlikely to help and will mar the cap. Just push firmly and make sure the button goes down all around, not just the tab on one side.
Summary: Remove the hose. Push down on the center where the hose is attached and watch to see the button is depressed on all sides. Pull UP on the cap while pushing down on the button. Turn the cap counterclockwise to open. Rotating back and forth (clockwise & counterclockwise) may help release the prongs if they are stuck.
Now the fixes:
- Some people advocate loosening the screws on the bottom of the cap (this was shown in a Tech Tip in Dirt Rider magazine). This might help... but looking how the cap is built I wouldn't recommend it as a particularly effective solution.
- Some guys have removed the orange three pronged widget from the cap and discarded it. Or just cut the prongs off. This results in a cap that doesn't lock on and makes the button non-functional. It may be unlikely that the cap will come loose in a fall, but I really don't like this solution.
- Some guys trim the corner that the prong catches on in the tank. This could be a bit scary, as you don't want to drop any bits into the tank or accidentally cut your tank too much. However, it is a really good idea to inspect that corner to make sure a deformation or bit of scarf isn't holding up the release of the prongs.
- My choice was to modify the prongs on the cap. This should work the same as modifying the tank, and if something goes wrong you have only hurt the gas cap. (Worse case is you just end up with fix #2.) I did the mod by removing the orange widget from the cap, trimming it, and then re-assembling the cap.
Rumor has it KTM has changed the caps for 2014... we will see!
Langganan:
Postingan (Atom)